One of the things I love about my job is working with really smart people, and my good buddy Chris Rockwell is no exception! We were working on a project together and needed to come up with a way to blacklist outgoing email in order to keep up with Canadian Anti-Spam Legislation (CASL) compliance. Basically, the client had an email address where the unsubscribe requests went to, those names were put into a database, and then emails sent to those people needed to be blocked from leaving Office 365. Previously, they were blocking these outgoing emails with their on-premises anti-spam appliance, but with moving to Office 365 they needed this functionality to continue. We came up with the process below, where email contacts are created in Office 365, and then added to a transport rule which would block any emails being sent to those users, as well as inform the sender of the block so that they could remove the user from their email lists.
Overall, I’m pretty proud of the solution we came up with, and the scripted process that Chris came up with worked excellently. Here’s how it was set up:
CASL Blacklist management
The process for blocking emails to users who were blacklisted consists of 3 parts – a transport rule, a group with contacts in it, and the contacts themselves.
Transport Rule:
The Transport Rule sets the various parameters of the blacklist:
- Which users are blacklisted;
- The explanation that gets populated on the NDR; and,
- Notification emails that get sent when the transport rule catches an outgoing email to someone on the blacklist.
Under the Exchange Admin Center navigate to Mail Flow and create a transport rule – we called ours CASL Blacklist.

The rule itself contains the following settings:
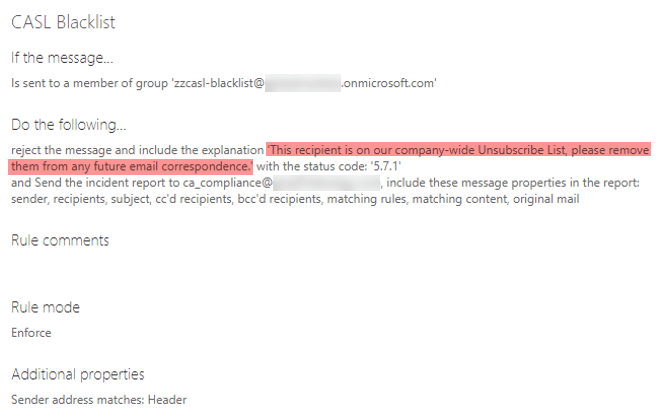
Basically, if a message is sent to a member of the CASL-Blacklist Group, reject their message with the highlighted explanation, and then send an incident report to the ca_compliance email account. Pretty simple stuff.
The magic comes in with how you manage adding and removing users from the CASL-Blacklist Group. This is just an ordinary distribution list and can be hidden from the GAL as well if required. Once we set up the group and imported all the users into it, we had a list of around 1100 users who would be blacklisted – the group can hold up to 100,000.
To help keep things consistent, all blacklisted contacts are created with the naming convention of “zzCASL0000”, with the number incrementing for each contact.
Contact Management:
Creating contacts is the same as always – log into the Office 365 Admin Portal, find the latest contact created, and note what number they are. Create a new contact named zzCASL00xx (incrementing by one from the last contact on the list), and then add them to the CASL-Blacklist group. To keep things clean, these contacts are created hidden from the address list.
The Display Name, Email and Hide from Organization Address List are the only mandatory fields, the rest are optional.
- Display Name: zzCASL00xx
- Email: Blacklisted email
If you need to remove the contact from the blacklist, simply search for the contact in the Address List and delete them – this will also remove the contact from the distribution group.
And now for the fun stuff – doing this all in one shot through PowerShell!
Using PowerShell:
The script starts out by connecting you to Exchange Online – if you have MFA enabled on your admin account, use this option.
[powershell]
#Connect to Office 365
$UserCredential = Get-Credential
$Session = New-PSSession -ConfigurationName Microsoft.Exchange -ConnectionUri https://outlook.office365.com/powershell-liveid/ -Credential $UserCredential -Authentication Basic -AllowRedirection
Import-PSSession $Session
Import-Module MSOnline
Connect-MsolService -Credential $UserCredential
[/powershell]
Next step is to start building out the contact information:
[powershell]
#Get the last contact name used
$casl = Get-Contact -Filter {DisplayName -like "zzCASL*"} -ResultSize Unlimited | Sort-Object -Property DisplayName | Select-Object -last 1
#Set external Email Variable
Write-Host `n
Write-Host ‘This process will add an email to the CASL Blacklist’
Write-Host ‘What is the email you would like to blacklist?’ -ForegroundColor Cyan
$email = Read-Host
#Set the contact name
Write-Host `n
Write-Host ‘What is the next available CASL Contact? ‘ -ForegroundColor Cyan -NoNewline
Write-Host "Last used Blacklist Contact- $casl" -ForegroundColor Yellow
$displayname = Read-Host("zzCASLxxxx")
Write-Host `n
#create the contact
Write-Host ‘Creating blacklist contact’ -ForegroundColor Cyan
New-MailContact -Name $displayname -ExternalEmailAddress $email -DisplayName $displayname
Write-Host ‘Complete’ -ForegroundColor Green
Write-Host `n
[/powershell]
And then finally, add the newly created contact to the distribution group:
[powershell]
#Add the contact to the blacklist control group
Write-Host ‘Adding contact to the CASL Blacklist’ -ForegroundColor Cyan
Add-DistributionGroupMember -Identity "CASL-Blacklist" -Member $displayname -BypassSecurityGroupManagerCheck
Write-Host ‘Complete’ -ForegroundColor Green
Write-Host `n
Write-Host ‘User has been created and added to the CASL Blacklist’ -ForegroundColor Green
Read-Host ‘Press a key to complete.’
[/powershell]
That’s pretty much it – a nice clean script that works well, and a very simple and easy to follow process!
