
Every now and again I come across some oddball migration scenarios that require some out-of-the-box thinking. It’s been a long time since I had to do a POP3 migration, but I ended up finding myself needing to come up with a solution to migrate a small number of users (around 50) who currently used Thunderbird, were downloading their email over POP3 and were not leaving a copy of their messages on the server.
Of course, if there was a copy of the messages on the server, then IMAP would have been an option – since there wasn’t, I needed a way of getting all my email out of Thunderbird into Office 365. Also, since it wasn’t Outlook, we couldn’t just create a new email profile, and attach the PST file for easy access or moving the email. Besides, even if we installed Outlook, migrating/importing from Thunderbird to Outlook is enough of a process – might as well do the job once, and take my emails directly to Office 365, rather than do a two-stage migration.
Using connected accounts used to be an option (albeit not my favorite one, since there are no controls to ensure that you’re getting everything you need migrated over), but Microsoft is deprecating that option, so it’s not a reliable way forward.
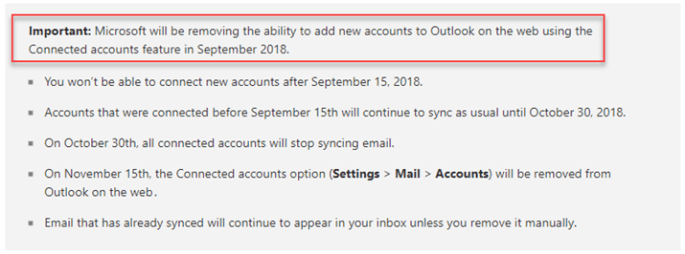
Mind you, a connected account is only going to help you if the messages are still on the server – my problem of migrating emails that have already been downloaded would still remain. That said, I managed to come up with a process that allows you to (fairly) easily migrate your email from your POP3 account into Office 365, using Thunderbird as your vehicle of choice.
Migrating Email from Thunderbird to Office 365
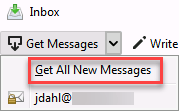
Start by opening Thunderbird on the user’s computer – since their email is connected to a POP3 account, make sure that Thunderbird has downloaded all new email from the server so that you can be certain you have everything:
Click on Get Messages – Get All New Messages:
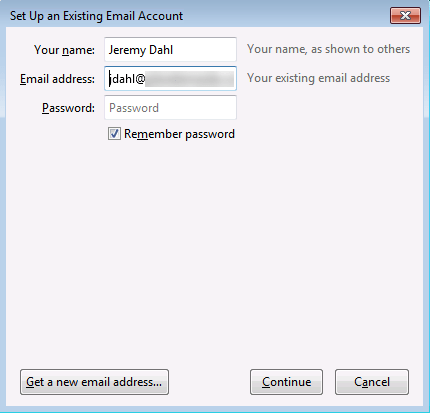
Next, connect your Office 365 account to Thunderbird by right-clicking on your account in the navigation bar on the left, and selecting Settings:

Under Account Actions (bottom left), choose Add Mail Account:

Type in your username, Office 365 email address (user@domain.com), and password – then click Continue:
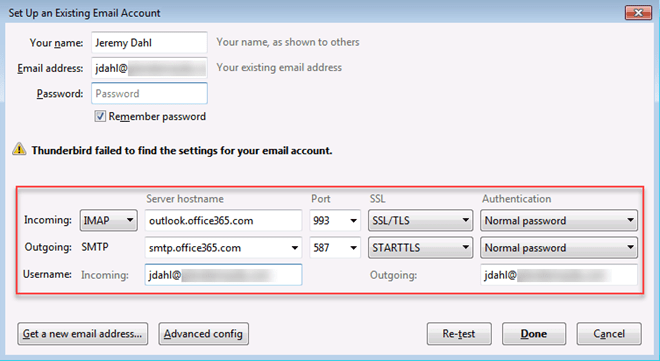
Incoming: IMAP
Server Hostname: outlook.office365.com
Port: 993
SSL: SSL/TLS
Authentication: Normal password
Outgoing: SMTP
Server Hostname: smtp.office365.com
Port: 587
SSL: STARTTLS
Authentication: Normal password
Make sure that your username is your full email address: user@domain.com
Once you have both accounts added, it might be a good idea to rename them so it’s clear which account is which – since we’re going to be moving emails between them, it helps to make sure you don’t get mixed up, and copy email in the wrong direction.
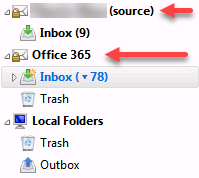
Now that your accounts are set up, you can start to copy email into the Office 365 account from your local Thunderbird folders – you can either create new folders on the Office 365 and copy the emails into them, or simply drag and drop the folder from the source account to the Office 365.
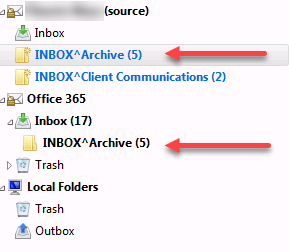
Note that you can also use Ctrl-A (Select All) to grab all the email in your inbox and drag it into your Inbox in Office 365. Please make sure that you give the process time to complete, and you don’t close Thunderbird down while it copies emails or syncs the changes up to Office 365.
Once the emails have finished copying over to your Office 365 folders, you can move on to migrating contacts and calendars.
** Note: Be very careful moving emails around – you can very easily cause data loss if your Thunderbird client crashes on you, or if you make a mistake. When in doubt, copy instead of move!**
Migrating Thunderbird Calendars
By the time this copy completes, you should have all your emails sitting in your Office 365 account now – depending on how much data there is, most of it will probably still be on the local PC, but it will be uploading to Office 365 as fast as your network connection will allow. Always remember to give this copy process all the time it needs to complete – don’t rush through the steps, or you might end up with an incomplete copy, and lost email.
Now it’s time to migrate our calendars:
Start by clicking on the calendar icon in Thunderbird to open your calendar window:

Right click on the calendar you’d like to migrate, and select Export Calendar:

Give your calendar file a descriptive name, and save it as an iCalendar (*.ics) file somewhere it can be easily found later. Repeat this process for each calendar that you want to export.

Since calendars are not going to sync properly through an IMAP connection, we want to import our calendar directly into Outlook on the Web. That way, our data source remains true (Exchange), and our clients can connect to it and have all your data everywhere, the way it’s supposed to be!
Open your Office 365 email account by logging in to https://outlook.office365.com using your email address and password. Click on the Calendar icon in the bottom left-hand side of the screen:

Click on Add calendar from the top of your screen, and then click on From file:
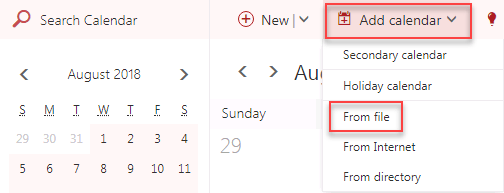
Click Browse, and select the ICS file you saved in step 3.

Click Save to continue:

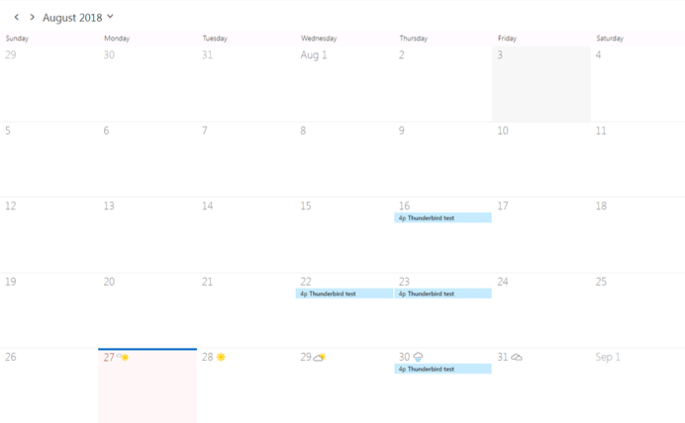
Within a few moments you should see your calendar info populated in Outlook, and you can then continue to import any remaining calendars, or simply return to your inbox.
Migrating Thunderbird Contacts
Now that calendars are properly imported, we can go ahead and bring our contacts / address books over.
Start by clicking on the Address Book icon at the top of the Thunderbird window:

Select the Address Book you want to export, and then click Tools – Export:

Note that if you click on All Address Books and then export, you’ll be prompted to save a new file for each address book listed.
As before, save the address book somewhere easily found later, and accept the default option of Comma Separated (System Charset):

It’s important to ensure that the CSV fields map correctly between your exported CSV file and the CSV format that Microsoft is expecting. If you’re unsure, you can download a template of the Microsoft CSV file from the contacts page by clicking Manage, then Export contacts.
Here are a few contact field mappings that should definitely be checked to confirm that they match up correctly:
| Exported field | Needs to become |
| Primary Email | E-Mail Address |
| Work Phone | Business Phone |
| Mobile Number | Mobile Phone |
Return to your Office 365 window, and this time select the People tab:

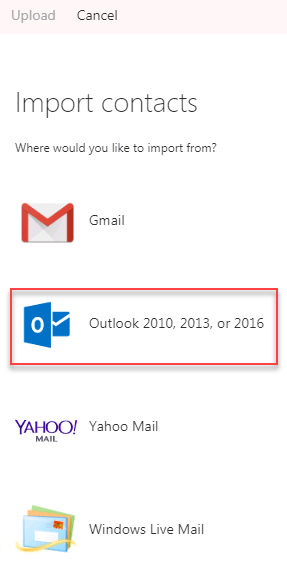
This time, from the top of the window, select Manage, then Import contacts:

Select the option to import from Outlook:
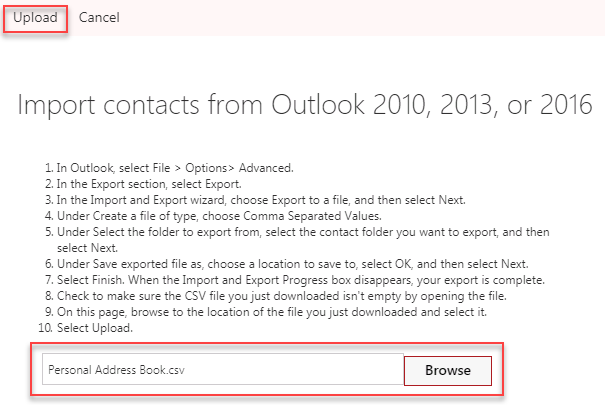
And then click Browse to select the CSV file you saved earlier, and then click Upload to continue:
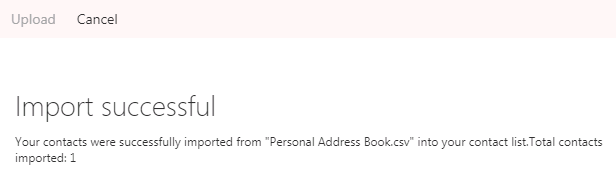
When the upload completes, you should see a message telling you how many contacts were imported, along with any issues that might need to be fixed:
Finally, click on Your contacts to view your imported contacts, and note any information that might be missing, or wasn’t imported. If you go back to your original CSV file, you should be able to fill in any missing information and upload the file again. If you need to reimport your CSV file, be sure to delete any contacts imported first, otherwise, you’ll end up with duplicates.
At this point in the game, you should be completely migrated over and ready to go – if your users are on mobile they can start using the Outlook app with a proper Exchange connection (no more POP3/IMAP!), and you can go ahead and deploy Office Pro Plus if your users have E3 licensing and set up an Exchange connection to your minty-fresh new mailbox in Office 365. If your users still want to remain using Thunderbird, they can keep using the IMAP account you created for them during this process, as long as they’re aware of the limitations of using IMAP over an Exchange connection. I’d personally rather use the Mail app in Windows 10 instead of Thunderbird, but maybe that’s just me…
Regardless, hopefully this post has helped you – feel free to ask questions or leave a comment below if you found this useful!

Excellent post. I want to thank you for this informative read, I really appreciate sharing this great post. Keep up your work.
Voice over IP Dallas
LikeLike