I recently was trying to resize the OS Disk of an Azure VM that I had just created, and ran into an error while using these instructions. In case you missed it, make sure you stop/deallocate your VM before trying to update the disk – otherwise it’ll just fail on you.
For the record, this is what the PowerShell looked like that I was trying to use:
$rgName = ‘My-Resource-Group’
$vmName = ‘My-VM’
$vm.StorageProfile.osDisk.DiskSizeGB = 1023
Update-AzureRmVM -ResourceGroupName $rgName -VM $vm
No dice! 😦
Update AzureRmVM: Managed disk size via virtual machine ‘My-VM’ is not allowed. Please resize disk resource at /pathtomanageddisk/diskname.
Error code: ResizeDiskError
Now, the reason for this is that I had created this new VM using managed disks, and you can’t update those directly using the Update-AzureRmVM command. It took a little bit of digging to figure out how to update that managed disk, so I figured I’d post how I’d done it, in the hopes that it’ll help someone else out.
Since it’s a managed disk, running Get-AzureRmStorageAccount will not show you your disk – instead, you need to run Get-AzureRmDisk.
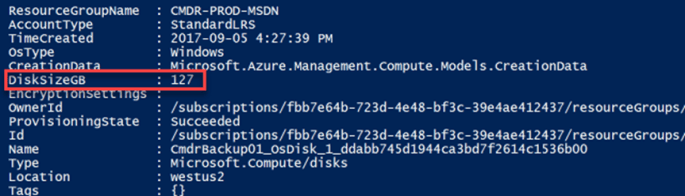
You can see that my disk size is 127GB, and not the glorious Terabyte I’m hoping to see:
Now that you’ve found your disk, go ahead and grab the name of your disk (or pull it into a variable if you prefer) and then simply update the size of the disk with the following command:
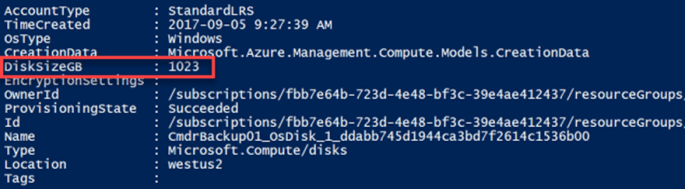
New-AzureRmDiskUpdateConfig -DiskSizeGB 1023 | Update-AzureRmDisk -ResourceGroupName $rgName -DiskName MyVM_OsDisk_1_crazylongnumbers
Verify that your disk looks correct by running
Get-AzureRmDisk -DiskName MyVM_OSDisk_1_crazylongnumbers
Next, Start your VM back up using the following command:
Start-AzureRmVM -ResourceGroupName $rgName -Name $vmName
(or use the Azure portal if you prefer, but c’mon… PowerShell!!)
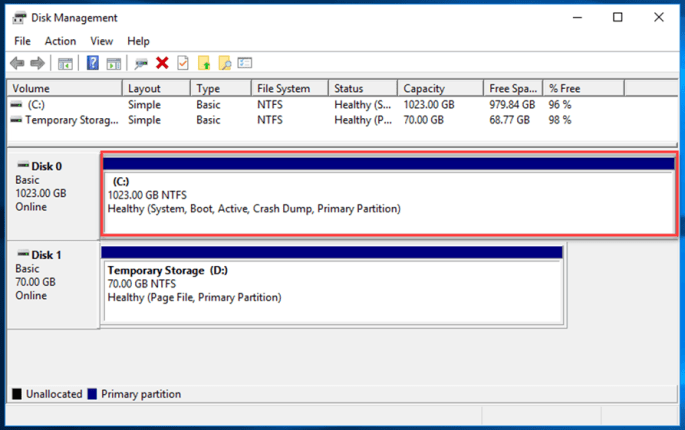
Once back in your VM, you can see that your disk size is unchanged – this is because Windows knows about the newly available space, but doesn’t auto-expand your disk drive.

Right click on the start menu, and select Disk Management. You can see your disk now has unallocated space to match what you specified in PowerShell:

Go ahead and select the disk and extend it to fill the usable space, and you’re good to go!
Hope this helps – if this helped you, or you have any questions, feel free to shoot me a comment below.

Is it possible to shrink a 1TB managed disk added drive down to 128GB Managed disk using this method?
Or do we have to create a new disk and copy the data over to the new drive?
LikeLike
Hey Jeff,
Sadly, it doesn’t look as if it’s possible – even on the link I mention at the beginning of the post, it has a warning that you can only expand the disk, and not shrink it. There’s a user voice requesting that exact feature to be added, but that’s it so far: https://feedback.azure.com/forums/281804-azure-resource-manager/suggestions/19004494-shrink-managed-disk.
If I find out anything different, I’ll post it back here.
Thanks,
Jeremy
LikeLike