
Office 365 Groups: Next Gen Distribution Lists?

Lately Microsoft has been putting a lot of focus on Office 365 groups as an ad hoc, user driven collaboration platform. These Office 365 Groups are also used for Microsoft Planner, as each Office 365 Group creates a plan, and every time a user creates a new plan a group is spun up in the background to handle all the collaboration and messaging pieces. Even going into the Exchange Online Portal and creating a new distribution groups will create an Office 365 Group by default – you need to select the option to create a regular distribution list instead.
These groups perform the job they were designed for quite admirably, and I’m a big fan of the user experience and control – however, where I feel these Groups are lacking is in the admin controls. To date, there is no way to export that mailbox data if you need to archive or delete the group, which makes it a pretty big gap in management (in my opinion at least).
Self Service: A Two-Edged Sword
One of the big selling features of these groups is that users can create their own groups – either in Outlook 2016 or Outlook on the Web. Now, this feature is great for allowing users some of the control that IT typically owns, and allowing them to quickly get some collaboration going – the downside is that it’s harder for IT to control and manage, and your directory can quickly become messy with groups users are creating to just test things out, or play around with the features. Thankfully, Microsoft has recently added the capability for users to delete groups that they own (something that was missing when groups where introduced).
Group Naming Policy
In order to keep a reign on the chaos of users creating and deleting groups, admins can implement a group naming policy in EAC, which will help to at least standardize the group naming structure, and highlight a few keywords that you want to keep off the naming roster.
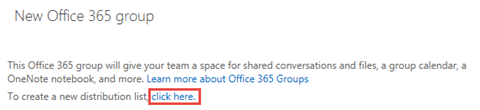
To configure your naming policy, log into the Exchange online portal (https://outlook.office365.com/ecp), navigate to recipients – groups, and then click on the three dots to open up the context menu.
Click on Configure group naming policy:

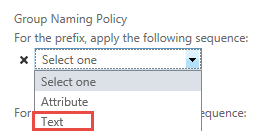
Your first option is a prefix, which can be either an Attribute or Text:
One idea would be to prefix these user-created groups with an identifier, like “O365-“, but you can obviously make this whatever you want.

And then again, you can add suffix(es) if you want – again, you can use whatever you want, but an idea would be to use the city attribute of the user creating the group:
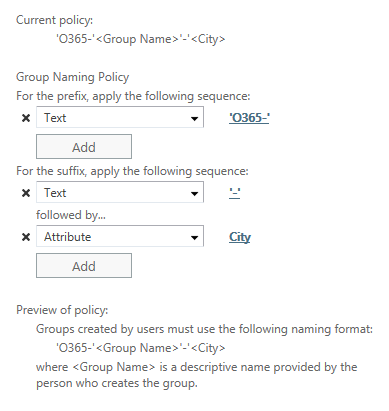
This policy will apply to all user created groups, whether created in Outlook or OWA – groups created from the admin portal will bypass this setting.
The Problem with Synced Groups
Oddly enough however, groups created through PowerShell or DirSync will still end up with this naming policy applied. This can become a problem, because a distribution group created on premise might be named “My New Group”, while the synced group will be named “O365-My New Group-Vancouver” (or whatever your policy is).
Here’s how you get around that problem:
<#
.SYNOPSIS
Script to create distribution groups and bypass the Exchange Online group naming policy.

.PARAMETER
GroupName This parameter is required - if spaces are required in the Group name, make sure to put the name in quotes.

.NOTES
File Name : create-DistributionGroup.ps1
Author : Jeremy Dahl (jdahl@masterandcmdr.com)

.EXAMPLE
.\create-DistributionGroup.ps1 -GroupName MyGroup
Creates a group named "MyGroup", with a primary SMTP address of mygroup@mydomain.com

.EXAMPLE
.\create-DistributionGroup.ps1 -GroupName "My Group"
Creates a group named "My Group", with a primary SMTP address of mygroup@mydomain.com
#>

param (
[Parameter(Mandatory=$true,ValueFromPipeline=$false)]
[string] $GroupName = ""
)

$smtpDomain="@mydomain.com" # Change this field to match your smtp domain
$exchangeServer="ExchangeServer" # Input your on premise Exchange Server here
$aadConnectServer="AADConnectServer" # Input your AAD Connect Server here
$GroupOU="OU=Managed Groups,DC=mydomain,DC=com" # Pick an OU for your groups to be created into - can be moved once the group is synced up.

$exchangeURI="http://$exchangeServer/PowerShell/"
$primarySMTP = $GroupName + $smtpDomain

# -- Connect to Office 365 -- #
$credential = Get-Credential
Connect-MsolService -Credential $credential
$ExchangeSession = New-PSSession -ConfigurationName Microsoft.Exchange -ConnectionUri https://outlook.office365.com/powershell-liveid/ -Credential $credential -Authentication Basic -AllowRedirection
$importresults = Import-PSSession $ExchangeSession -AllowClobber

<# -- Create Group in Exchange Online -- #>
New-DistributionGroup -Name $GroupName -DisplayName $GroupName -PrimarySmtpAddress $primarySMTP -IgnoreNamingPolicy
Remove-PSSession $ExchangeSession

<# -- Create a local Exchange session and import session for use -- #>
$LocalSession = New-PSSession -ConfigurationName Microsoft.Exchange -ConnectionUri $exchangeURI -Authentication Kerberos
Import-PSSession $LocalSession -AllowClobber

<# -- Create Group On Premise -- #>
New-DistributionGroup -Name $GroupName -OrganizationalUnit $GroupOU

<# -- Get Credentials and run AADSync remotely -- #>
$adCreds=Get-Credential
Invoke-Command -ComputerName $aadConnectServer -ScriptBlock {Start-ADSyncSyncCycle -PolicyType Delta} -Credential $adCreds
Write-Host "Initiated Azure AD Sync - Delta" -ForegroundColor Green
This script can be run on premise, and only requires the Group Name as a parameter. It then connects to Exchange Online and creates the group, ignoring the naming policy. From there, it connects to Exchange on premise, and creates the same group, using the same group name. Once AAD Sync runs, it matches the group together, and treats it as a single group going forward.
Once the groups have synced up, I’ve confirmed that you can add members to it from on premise as normal, and even delete it on premise (removing it from the cloud as well) if necessary.
That’s it – problem solved!
