
One of the challenges when migrating from Google Suite to Office 365 is coexistence – mail routing is not that hard to configure, and free / busy (Calendar Interop) is now available and works fairly well. Google’s instructions are pretty straightforward and are available here. Just remember that you need to disable your user’s calendar in G Suite in order for the Interop to head across to Office 365 and look up availability. Without that, users will only ever see their Google Calendars, and you’ll run into issues.
But…
This is all well and good – however, Calendar Interop only works with users, not resource mailboxes.

The reason why resource mailboxes are not supported (to the best of my knowledge) is because a resource calendar in G Suite is not a user object like it is in Exchange Online – instead it’s a unique calendar object that ends in @resource.calendar.google.com… there’s no way for an Exchange Online org to federate with that!

Now what?
Since I knew that I wasn’t going to win with free busy going towards that resource in Google, I turned my attention to Exchange Online, since I know exactly what my calendar interop options look like. As expected, if I create a meeting room in Exchange Online, and a user object in G-Suite (calendar disabled), free busy flows as expected – that’s at least a step in the right direction. Next up from there is making sure that this calendar can still accept meeting requests and process them even though it’s coming from outside the org. Turns out it’s not that hard – here’s what you need to do.
First off, create new resource mailboxes in Exchange Online. If you’re planning to migrate the calendars, you can use a third party tool like Migration Wiz, or manually export them from your source and re-import them using Outlook. In this instance here, I used the Migration Wiz tools, and it migrated them over quickly and cleanly. I still exported them anyway, just so I have a backup in case things go wrong – never hurts to have a way back if things go sideways!
Now that the calendars have been migrated (and backed up), we need to configure the interop and booking options – start in G Suite by deleting your migrated meeting rooms, and then create new user accounts with the exact same name as your deleted resource calendars.

You can of course use different names, but this will make it easier for users to find the rooms they’re looking for without a lot of extra effort. As long as the email address matches the email of the resource mailbox in Exchange Online, free / busy lookup will work properly.
Next step is to configure mail routing – make sure that your resource mailbox in Exchange Online has a secondary smtp address that you can route to. To keep things simple, I just use the onmicrosoft.com domain. To configure mail routing in G-Suite, you need to go into Apps > G Suite > Gmail > Advanced Settings > Recipient Address Map and click Edit.
Under option 3, type in the name of your source and target address, separated by a comma, like so:
myboardroom@domain.com,myboardroom@domain.onmicrosoft.com

Click Save, and then Save again to make sure your changes are properly applied. After this, anybody who sends an email from Gmail or even external (since your MX records should still be pointed at Google) will route properly to your mailbox in Office 365.
At this point, you should have free / busy and mail routing working correctly – all that’s left to do is to configure your calendar in Exchange Online to accept meeting requests from Google users.
Go ahead and log into Exchange Online through PowerShell, and run the following command:
Set-CalendarProcessing my_boardroom -ProcessExternalMeetingMessages $true
Confirm that your settings are properly applied by running this command:
Get-CalendarProcessing my_boardroom | fl AutomateProcessing,AllRequestInPolicy,ResourceDelegates,ProcessExternalMeetingMessages

Once Process External Meeting Messages, and Automate Processing are set correctly, your meeting requests will be properly processed and booked (or declined) based on the rules you configured in your calendar resource processing settings.
I’m sure you’re wondering why I’ve included the settings for All Request in Policy, and Resource Delegates – I’ve run into this a few times, so I figured I’d make sure to include it so that when I’m trying to figure out why my rooms aren’t auto-accepting meeting requests, I’ll come back here and remember what I need to do! 😀
Once you’ve assigned a delegate on a meeting room, All Request in Policy switches to False, and the delegate starts to receive meeting requests instead of auto approval. I’ve found this to be the case even when I’ve told the GUI to accept or decline booking requests automatically.
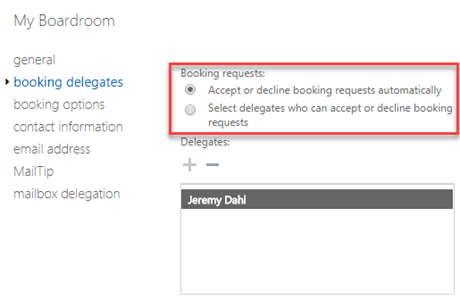

To be honest, I haven’t made it work yet with having both a delegate and auto accept on at the same time – it’s only ever seemed to be one or the other. So, to get everything working properly, set All Request In Policy to $true, and Resource Delegates to $false, and you’ll be good to go.
Rooms, how do I book?
The final piece to mention in all this is that once you’ve deleted these resource calendars in G Suite, users will no longer be able to pick them as rooms when they’re creating a meeting – this might seem obvious to you, but if you haven’t planned to communicate these changes with your users, you’re going to end up with more support calls, and unhappy people!
The first thing to remember is that your rooms will now be gone – when someone clicks on the Rooms tab in a meeting window, they’re going to only see the meeting rooms you’ve left behind (or none, if you’ve moved them all).
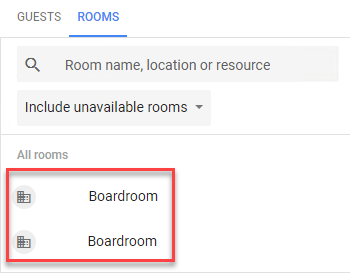
Instead, users can click on the Guests tab, and start typing in the name of the board room they want to book:

You see now why we used the same names for our new accounts as the rooms we deleted? Your users will love you for it!
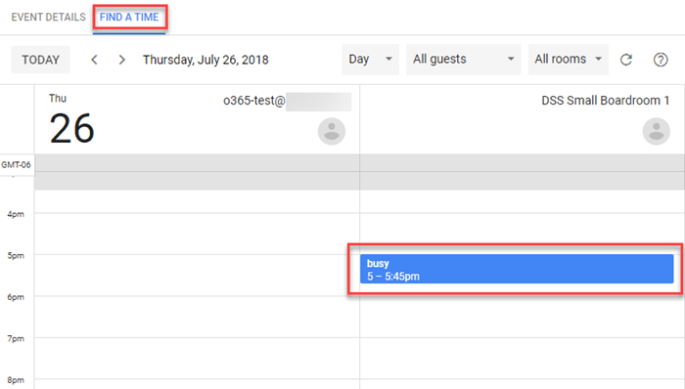
Next, click on Find A Time, and you can see the availability of the room you want to select:
Once you have your meeting details set, click Save, then Send – within a few moments you should receive confirmation that your room has been booked in Office 365. Checking the calendar again, you’ll see your meeting booked as intended:

One last important change to remember is that if your users are used to adding the resource calendar to their calendar in Google, that won’t work any longer – all they’re going to get is this error message:
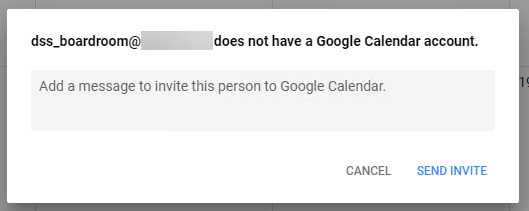
This is expected, since we’ve created an account without a calendar so that Interop works properly – simply show your users the New Way, and everybody will be happy(ish) again!
Hope this helps 😀
