
I recently needed to configure a hierarchical address book (HAB) on one of my projects, and the process was interesting enough that I thought it was worth sharing – like most things I post, this is more a collection of all the different places where I’ve researched how to do something, and put together what is (hopefully) a straightforward step-by-step process, with some additional information to help round out your understanding of what you’re deploying.
Hierarchical Address Books vs. GAL Segmentation
Hierarchical Address Books in Exchange are used when a logical structured approach to viewing the address list is required – HABs are not used to prevent people from seeing other users or contacts (segmenting the GAL), but to make it easier for users to find the contact information they’re looking for, especially in a distributed environment where a flat GAL makes it challenging to find users from another business unit, division, company or even geographical location.
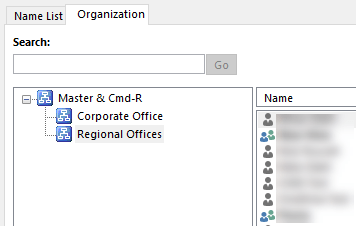
When you configure a HAB, all users are still displayed in the GAL in a typical flat, alphabetical list, and are searchable as normal when sending an email. What changes is that an Organization tab is added – clicking on this tab will display the hierarchy you’ve created, and users can navigate through the various levels of the address book to find the people they’re looking for.
GAL Segmentation – also called Address Book Policies, is what you use when you want to only allow users to see the address lists that they are a member of. Users are only visible in the GAL that they’ve been assigned to, which allows you to maintain privacy between directories without having an actual legal separation. Users are assigned to these segregated containers by adding them to Address Lists, which are in turn added to Address Book Policies (this can be automated through PowerShell).
Note that by default, if a user types in the name of another user who’s not in their Address Book Policy, their name will still resolve, as users are hidden across the address lists, but are still members of the entire GAL – remember, this is privacy, not full separation. This can be scoped down by enabling the ABP Routing Agent.
Points to Remember
When creating a HAB in Exchange/Exchange Online, there are a couple things you want to keep in mind:
- Clicking on Name List shows the normal GAL, and Outlook will remember your last view – if your user doesn’t want to see the HAB as their primary view, they won’t need to.
-
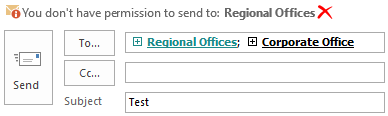
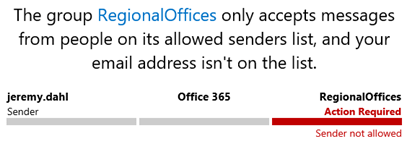
Hierarchies are created as distribution groups – special care needs to be taken to ensure that users don’t email the entire org by emailing one of these distribution lists
- Hierarchical Address Books are not intended to provide true address list separation, but more to provide an easy to find hierarchy, or list of users broken down by whatever criteria is configured.
- Users or contacts created in one of the hierarchical lists is viewable org wide – hiding them from the GAL hides them everywhere, not just in the specific address book.
- A HAB is only viewable in Outlook and isn’t visible in Outlook on the Web or on mobile devices. GAL Segmentation on the other hand, is viewable in Outlook on the Web and mobile devices, as the address list that you’re a member of is the only one you have access to.
- Finally, both options can be collapsed later if you no longer need them – removing either the GAL segments or Hierarchical Address Book will replicate to all users within a few days.
Creating a Hierarchical Address Book
With these points in mind, let’s get started!
Hierarchical Address Books are created through PowerShell, although since we’re essentially creating Distribution Lists with additional attributes, these groups and memberships can be managed afterwards both through PowerShell and through the Exchange Admin Center. Once your hierarchy is created, it’s populated quite simply by just adding users to the various Distribution Lists – like any other DL in Exchange Online, users can be members of multiple groups, so you have some flexibility in how you present your lists.
Note that when you create your structure, it’s created alphabetically by default, but you can modify that later through managing an attribute called the Seniority Index – don’t worry, I’ll cover that in the PowerShell as well.
Our first three commands create the first group which will become the root of our hierarchy, and enables the HAB for our Exchange organization:
[powershell]
# Step 1: Create your hierarchy root:
New-DistributionGroup -Name "Master & Cmd-R" -DisplayName "Master & Cmd-R" -Alias "CmdrRoot"-Type "Distribution"
Set-Group -identity CmdrRoot -IsHierarchicalGroup $true
# Step 2: Update the Organization Configuration to set a Hierachical Root
Set-OrganizationConfig -HierarchicalAddressBookRoot "CmdrRoot"
[/powershell]
Note that you want your Hierarchy Root to be something descriptive, so it’ll look like the company name (or whatever you want it to be). From there, we’re going to move on and create the next levels of our hierarchy:
[powershell]
# Step 3: Create distribution groups
# HAB First Level
New-DistributionGroup -Name "Corporate Office" -DisplayName "Corporate Office" -Alias "CorporateOffice" -Type "Distribution"
New-DistributionGroup -Name "Regional Offices" -DisplayName "Regional Offices" -Alias "RegionalOffices" -Type "Distribution"
# HAB Second Level
New-DistributionGroup -Name "Calgary" -DisplayName "Calgary" -Alias "cmdrCalgary"-Type "Distribution"
New-DistributionGroup -Name "London" -DisplayName "London" -Alias "cmdrLondon"-Type "Distribution"
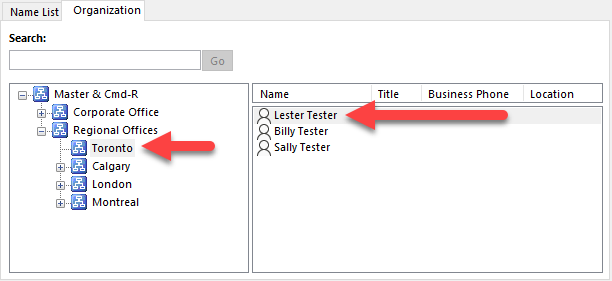
New-DistributionGroup -Name "Toronto" -DisplayName "Toronto" -Alias "cmdrToronto"-Type "Distribution"
New-DistributionGroup -Name "Montreal" -DisplayName "Montreal" -Alias "cmdrMontreal"-Type "Distribution"
[/powershell]
At this point, the groups have all been created – now we set them to hierarchical groups and nest them into our hierarchy:
[powershell]
# Step 4: Set each group as hierarchical group
Set-Group -Identity CorporateOffice -IsHierarchicalGroup $true
Set-Group -Identity RegionalOffices -IsHierarchicalGroup $true
Set-Group -Identity cmdrCalgary -IsHierarchicalGroup $true
Set-Group -Identity cmdrLondon -IsHierarchicalGroup $true
Set-Group -Identity cmdrToronto -IsHierarchicalGroup $true
Set-Group -Identity cmdrMontreal -IsHierarchicalGroup $true
# Step 5: Nest the groups appropriately to create the hierarchy
# First Level
Add-DistributionGroupMember -Identity CmdrRoot -Member CorporateOffice
Add-DistributionGroupMember -Identity CmdrRoot -Member RegionalOffices
# Second Level
Add-DistributionGroupMember -Identity RegionalOffices -Member cmdrCalgary
Add-DistributionGroupMember -Identity RegionalOffices -Member cmdrLondon
Add-DistributionGroupMember -Identity RegionalOffices -Member cmdrToronto
Add-DistributionGroupMember -Identity RegionalOffices -Member cmdrMontreal
[/powershell]
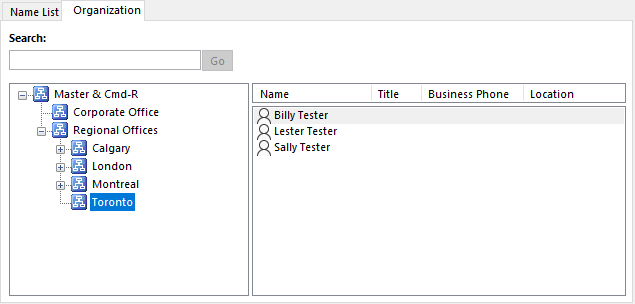
Now we have a hierarchy that looks like this:
-
Master & Cmd-R
- Corporate Office
-
Regional Offices
- Calgary
- London
- Toronto
- Montreal
Our final step is to populate our groups with users and contacts:
[powershell]
# Step 6: Add users to groups based on Location
$vancouverUsers = Get-MsolUser | Where {$_.City -match "Vancouver"}
foreach ($v in $vancouverUsers){
Add-DistributionGroupMember -Identity CorporateOffice -Member $v.UserPrincipalName
}
$calgaryUsers = Get-MsolUser | Where {$_.City -match "Calgary"}
foreach ($c in $calgaryUsers){
Add-DistributionGroupMember -Identity cmdrCalgary -Member $c.UserPrincipalName
}
$londonUsers = Get-MsolUser | Where {$_.City -match "London"}
foreach ($l in $londonUsers){
Add-DistributionGroupMember -Identity cmdrLondon -Member $l.UserPrincipalName
}
$torontoUsers = Get-MsolUser | Where {$_.City -match "Toronto"}
foreach ($t in $torontoUsers){
Add-DistributionGroupMember -Identity cmdrToronto -Member $t.UserPrincipalName
}
$montrealUsers = Get-MsolUser | Where {$_.City -match "Montreal"}
foreach ($m in $montrealUsers){
Add-DistributionGroupMember -Identity cmdrMontreal -Member $m.UserPrincipalName
}
# Step 7: Add contacts to groups based on Location (optional)
$contacts = Get-Contact -ResultSize Unlimited
foreach ($c in $contacts){
if ($c.City -match "Calgary"){
Add-DistributionGroupMember -Identity cmdrCalgary -Member $c.Identity
}
elseif ($c.City -match "London"){
Add-DistributionGroupMember -Identity cmdrLondon -Member $c.Identity
}
elseif ($c.City -match "Toronto"){
Add-DistributionGroupMember -Identity cmdrToronto -Member $c.Identity
}
elseif ($c.City -match "Montreal"){
Add-DistributionGroupMember -Identity cmdrMontreal -Member $c.Identity
}
}
[/powershell]
And there you have it – Hierarchy created and populated!
If you want to change the sort order, you can do this through using the -SeniorityIndex weighting. A Seniority Index of 100 puts them to the top, and then you can cascade your groups or users down from there, like so:
[powershell]
# Set the Sort order (Seniority Index)
Set-Group -Identity cmdrToronto -SeniorityIndex 100
Set-User -Identity lester.tester -SeniorityIndex 100
[/powershell]
Note that I’ve left everything else to sort alphabetically, and I’ve only pushed Toronto and Lester Tester to the top of their respective hierarchies. You can customize this however you like, just remember that the more custom sorting you’re applying is the harder it will be to maintain, so don’t go crazy with custom sorting (unless that’s your jam of course, in which case – have at it!)
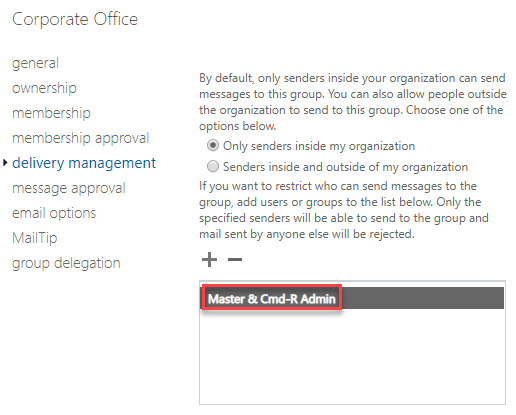
If you want to allow users to email the whole DL then just leave them as they are when created. On the other hand, if you want to make sure that those groups are for the hierarchy only and not being used like a regular distribution list, simply go back into the Exchange admin center, find your group and set the restriction there. In my case, I just set the groups to only accept email from an admin account that I use very infrequently, but you can obviously customize this to whatever you’d like it to be.
Dismantling the Hierarchy
If you no longer need to have a hierarchical address book, you can quickly and easily remove it by using the following command:
[powershell]
# Tear it all apart
Set-OrganizationConfig -HierarchicalAddressBookRoot $null
[/powershell]
From there, you can decide if you want to keep the remaining distribution lists or not – just be mindful of whether or not they might be in use before you delete them. If you’re confident that these distribution lists are not being used anywhere else, go ahead and delete them to clean things up.
All in all, a cool feature, albeit one that doesn’t get asked for often – feel free to leave a comment below if you have any questions, or if this helped out at all!

Question:
Is it possible to use replicated with ADCONNECT Distribution Groups for the HAB?
The idea is because we have a hybrid Exchange 2013 deployment, to create the distribution groups in the Exchange OnPremises and then to replicate to the Exchange OnLine.
Could be possible then to use these synced Distribution Groups for controlling the HAB
Thanks?
LikeLike
Hi Carlos,
I tried updating an existing synced group using “Set-Group -Identity “New Hires” -isHierarchicalGroup $true” and got the following error:
“The action ‘Set-Group’, ‘IsHierarchicalGroup’, can’t be performed on the object ‘New Hires’ because the object is
being synchronized from your on-premises organization. This action should be performed on the object in your
on-premises organization.”
Unfortunately, I don’t have Exchange setup in this lab so I can’t try creating the HAB on-prem and syncing it up. In theory, it should work – I’d suggest creating one on-prem and letting it sync up and see what it does.
LikeLike