I posted some time back about the new feature that came up in Office 365, that allowed you to purchase a domain directly from GoDaddy and completely configure it – all without having to leave the Office 365 portal.
A few caveats are that it only seems to be available in Midsize in Enterprise plans (to the best of my knowledge), and you can’t do the whole thing without leaving your Office 365 portal if you live in Canada. I stepped through the options on an American client, and the whole process was pretty straightforward – just Next, Next, Next your way through the prompts.
At any rate, I’ve gone ahead and purchased a new domain name for my blog, and I’m going to add it to Office 365. As expected, I had to leave my Office 365 portal momentarily and head over to GoDaddy’s website, but the process for purchasing the domain was painless, and took a matter of minutes. Once you’ve got your domain, head back in to Office 365, and select domains, and then Add a domain (like always):

Once you’ve typed your domain name in, things get a bit different – since the domain has been purchased through GoDaddy, you have the option of letting them confirm and configure it for you, like so:

Once you click Confirm ownership, you’ll be prompted to log in to your GoDaddy.com account – log in with the credentials you set up when you first created your domain, and click Secure Login:
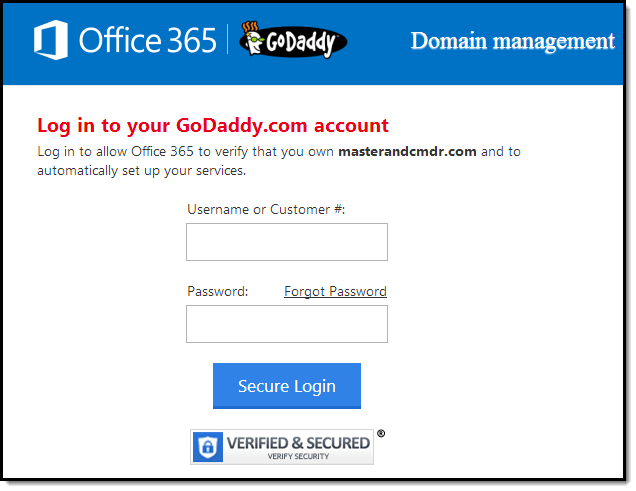
Click Accept to confirm Access, and you’re off to the races!


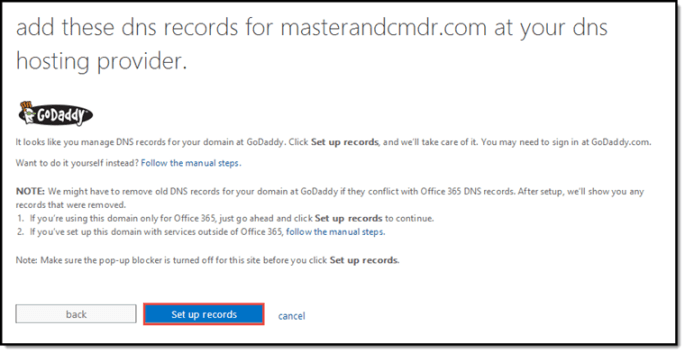
If you check your domain settings in GoDaddy, you’ll see that the TXT record for domain verification was automatically created, just like you’d expect.

As before, you can delete this domain record once you’re done, as it’s not used again once your domain has been verified for Office 365.
After you’ve gone through the next step (Adding users), move on to Setting the domain purpose – you’ll find a nifty little nugget that Microsoft has put in for configuring your Public Website.

This little bit of information was something that was previously never made clear, and I applaud Microsoft for making that part obvious to the end user. I’ll detail the steps in another blog post, but really, the only way you could configure your primary domain for Exchange, Lync, and your public website was to configure domain forwarding in your domain host.
Go ahead and choose the options you need, and click next: once again, GoDaddy is ready to make the changes you need to bring everything online.

Click Finish, and you’re all done! Overall, I think that the process works incredibly smoothly, and makes it very easy for someone to configure a new domain with Office 365. While it might not make someone move their domain over to GoDaddy before configuring Office 365, it’s definitely going to make them the ones to beat when it comes to purchasing and setting up new domains.
Way to go, GoDaddy!

I agree. I went through this last week with skaggej.com and it was a breeze. It should be fairly similar with other registrars as well, but I can’t say for sure as mine is through GoDaddy too.
LikeLike
I set up everything to go to Office 365, but discovered the website setup is woefully inadequate. Now, I can’t find any info about moving just the website portion back to GoDaddy in order to have the website I want.
Any info I can get would be greatly appreciated.
LikeLike
Hey Sherri,
Sorry to hear that the public website in SharePoint Online didn’t work out for you – I agree that it doesn’t have the wide array of options that WordPress does, and it seems to be best suited (in my opinion) for someone who wants the very simple options, or for someone who has the skillset to work the code and make it do what they want.
Switching back to GoDaddy should actually be a fairly simple process – Follow the steps in Make your public website online or offline to take your Office 365 public website offline.
If you have a custom domain set up to point to your Office 365 public website, and you manage your own DNS records, remove the CNAME record that points to your Office 365 public website or point it to your website in a different location. See the step-by-step instructions for creating DNS records at your DNS hosting provider.
If you have a custom domain and Office 365 manages your DNS records, follow the instructions in Update DNS records to keep your website with your current hosting provider.
I pulled these instructions direct from the Microsoft site, as I unfortunately don’t have a tenancy I can test this with – let me know if this works for you, and if you have further issues, I’d be happy to help out!
LikeLike